BLF Q8, más de 6 mil lúmenes por 40 dólares
Publicado: 07 Abr 2017 11:16
Buenas, abro este hilo para hablar de esta, en mi opinión, magnífica linterna diseñada y personalizada por foreros de Budgetlightforum, que parece ser que, tras 1 año del inicio de este proyecto, pronto estará a la venta.
Sé que hay varios compañeros de este foro que estáis apuntados en la lista para comprarla, pero me ha extrañado que nadie haya hablado de ella por aquí, por eso he abierto el hilo, y de paso, quizás se apunte alguna persona más que no estaba al corriente de este tema.
Antes de nada, pongo el hilo original del que saldrá la información que voy a poner:
http://budgetlightforum.com/node/45915
Unas fotos de la linterna, o más bien, del segundo prototipo de lo que será la linterna finalmente:


La linterna estará fabricada por Thorfire, se venderá en Banggood, y vendrá con el logo "BLF Q8", posteriormente la propia Thorfire podrá seguir vendiendo esta linterna, con su propio logo y al precio que ellos consideren oportuno.
Aquí teneis el rendimiento lumínico del prototipo 2 con distintas baterías:
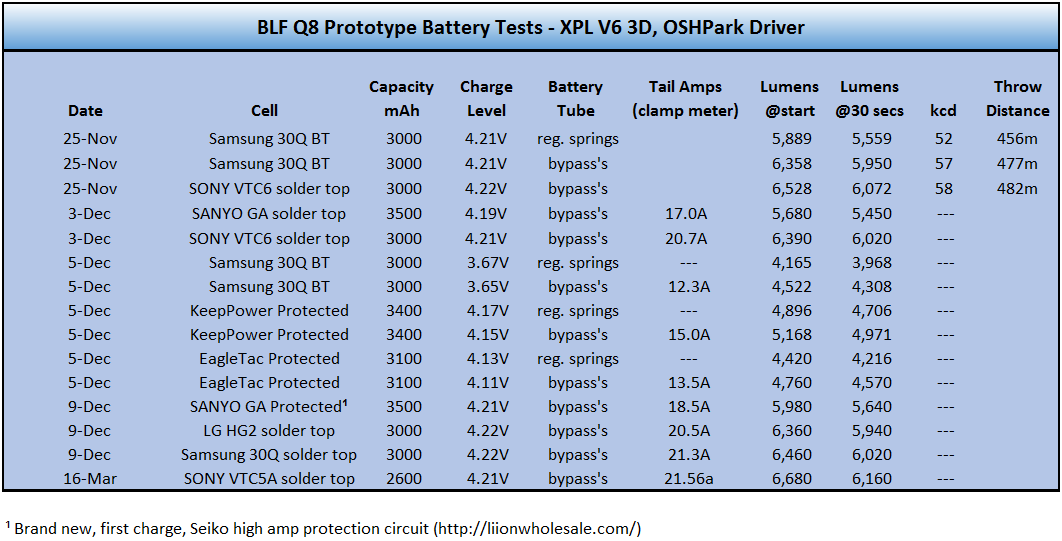
Vale, ya tenemos el rendimiento que saca el tercer prototipo de la BLF Q8, que ahora lleva de serie doble muelle:

Las características de la linterna son estas:
BLF Q8
………….. Marking/logo “BLF Q8” for the groupbuy, manufacturer can choose own marking/logo afterwards
.
.
Pricing
………….. $40 .. including shipping …. manufacturer can decide own pricing afterwards
.
.
Emitters
………….. 4 pieces …. 3535 footprint
.
………….. Cree XPL V6 3D ……. Yes for now it is decided the non HI XPL
.
………….. LEDs mounted on DTP stars (NOW a sweet coper DTP ledboard in one piece!)
.
.
Internals
………….. Integrated LED shelf …. for good thermal dissipation at least 4mm thick
.
………….. 20 AWG Wires …………
.
………….. Driver retainer ring (NOW proto 2 has screws holding the driver down covered with a protective ring)
.
………….. Double springs on tail PCB
.
………….. Threads square or trapeziod (not triangular) for battery tube
.
………….. Anodised threads part battery tube that screws into the head for lock out
.
………….. Tailap can be unscrewed to access the pcb connecting the – side of the cells
.
………….. Threads square or trapeziod (not triangular) for tail cap
.
………….. Threads bezel can be anything manufacturer chooses
.
………….. Electronic side switch (NOW proto 2 with illumination and rubber cover)
.
………….. Mounting for tripod
………………….. mounting nut hole not drilled though the whole body to ensure waterproofing placed opposite of the button
.
.
Optics
………….. Aluminium reflector ……. same top sizes as the older SRK reflectors
.
………….. Glass lens ……………. 2mm thick
.
.
Protective
NOW brass contact ring on driver against wear and tear like high end soda can lights have!
………….. O-ring bezel ………. quality thus thick and perfect fit
.
………….. O-ring battery tube … quality thus thick and perfect fit
.
………….. O-ring tail cap ……. quality thus thick and perfect fit
.
………….. Aliminum alloy …….. 6061-T6
.
………….. Type II anodisation…not HA3 for the groupbuy
.
………….. Waterproof side switch
.
………….. Stainless steel bezel
.
………….. Light comes with spare o-rings in all the sizes used
.
.
Software
………….. Tom E Narsil firmware
………….. Several modes and blink modes
………….. User configurable
………….. Fixed modes and ramping
………….. Voltage check
………….. Low voltage cut off
………….. lock out
.
.
Driver design
………….. Tom E Electronic switch driver for Narsil firmware
………….. Very low parasitic drain
………….. Able to run 1,2,3 and/or 4 button top 18650 cell(s)
.
……. MCU …. Atmel ATTINY85V-10SH or ATTINY85-20SU package is important: 8S2
.
……. FET …. NOW used PSMN3R0-30YLDX we aim for change to PSMN2R0-30YLDX
…………………… form factor: PPAK SO-8
.
……. Resistor ….. 0805 SMD 47K OHM 1% 1/8W
.
……. Resistor ….. 0805 SMD 220K OHM 1% 1/8W
.
……. Resistor ….. 0805 SMD 47K OHM 1% 1/8W
.
……. Diode …….. Schottky, 10v 570 kA SOD323 Manu PN: ZLLS410TA, Digi-Key PN: ZLLS410CT-ND
.
……. Capacitor…. 0805 Ceramic, 12uF 16V X7R
……………………………….. If possible 12 uF or higher instead of 10 uF — may be required
.
……. 7135 chip …. 7135 350 mA 7135 amp regulator used for low modes
.
.
Quality
……………. Samples 100% as agreed and specified before continuation to actual sale.
.
……………. Final production lights 100% as agreed, specified and samples
.
……………. Video of drop test shipment packaging made available before lights available for sale.
…………………. This video shows at least 10 drops of the light in packaging from at least 1 meter high
…………………. falling in different angles, the 8 corners, bottom and side hitting the ground first
.
…………….All lights tested before shipping to spot and fix problems and avoid DOA.
Aquí podeis ver como es el funcionamiento de la linterna con su complejo driver programable:
Summary of Features
Ramping – smooth 150 level ramping, simple click&hold ramps, 1 click ON to last level, 1 click OFF
Mode Sets – Simple 1 click ON, 1 click OFF, navigate to next and previous modes
12 mode sets to choose from, 1 to 8 modes/output levels can be configured, and then saved
Modes can be arranged for low to hi, or hi to low
Multiple strobe and beacon modes can be accessed, total of 5 special modes (16 Hz strobe, police strobe, bike strobe,
2 sec beacon, and 10 sec beacon)
Low Voltage Protection (LVP) – output is decreased starting at ~3.0v, shut off at ~2.7v
Turbo timeout can be enabled/disabled, and the time be set (works for high output levels in Ramping too)
When power is applied, 2 blinks indicate it’s ready
An Indicator LED (SMD LED) is supported as a locator LED and low voltage indicator
Battery Check – blink out the voltage level (ex: 3.7v would be 3 blinks, pause, then 7 blinks)
Lock-out feature for the side switch – enabled and disable by a special click sequence
20 second button press safety lock-out feature (engages lock-out after 20 secs being held)
Mode memory can be enabled to quickly restore the last used mode setting, but not recommended
A power tail switch can be used to change modes w/memory
.
.
Configuration Settings Summary
1. Primary mode setting of Ramping or Mode Set
2. 12 sets of modes to choose from, from 1 to 7 output levels
3. Moonlight mode can be optionally added (enable/disable), and the moon output level custom set
4. Set the mode order, default is low to hi, hi to low can be enabled
5. Enable or disable mode memory
6. Enable/disable turbo timeout and sets the length of time from 30 secs to 10 minutes
7. Enable/disable the Locator LED feature (locate the flashlight in the dark)
8. Set the moon mode brightness from 1-7 (3 is recommended, but 2 may work, and 4-7 used to make it brighter)
9. Configure where Battery voltage level blinks – both on the Indicator LED and primary LED, or just the Indicator LED
10. Enable/disable the Indicator LED – disabled it if it’s not wired up or to disable it’s use completely
11. Enable/disable a power tail switch for switching modes with memory. An OTC (Off Time Cap) is not needed, but may
not work with all hardware designs.
.
.
Ramping Operation
From OFF, click&hold ramps up with a pause at moon level — click to turn ON at last level
From ON, click&hold ramps up, but if at max, it will ramp down – click to turn OFF
Double-click from OFF or ON to turn on max level
Triple-click from OFF or ON to engage Battery Check mode
.
.
Mode Set Operation
From OFF, a click goes to 1st mode, while a click&hold (~1/3 sec) goes to last mode
When ON, a click goes to next mode, while a click&hold goes to the previous mode
if paused in a mode (over 1.2 secs), the mode locks in and then a click will turn the light OFF
If you are locked in a mode, a click&hold will still work to go to previous mode, and the lock-in cancels
in any mode, including OFF, a long hold (over 1.1 sec) will turn the 1st Strobe ON
When in Strobe, clicks without pausing will skip to the next special mode (strobe or beacon). The special mode
navigation works just like normal modes: click&hold goes to the previous special mode, paused in a mode will lock it in
.
.
Low Voltage Protection
With the light ON, when the voltage falls below the threshold of 3.0v, it will blink three times, then drop the light down one
mode. If the current mode is the lowest mode, the battery voltage has to fall below 2.7v for the light to be turned OFF. If the
Indicator LED is enabled, it will blink three times as well every time the modes are dropped down, and will also blink twice
every 8 seconds while the light is ON. Once the light is turned OFF after low voltage has been detected, the Indicator light will
continue to blink twice every 8 seconds for 6 minutes after being turned OFF, then the light goes into power saver mode. The
Indicator LED will be turned OFF if the battery voltage is below 3.0v prior to going into power saver mode. So with a
In a Mode Set (non-ramping), from OFF, do a click quickly followed by a click&hold and keep holding for 2.5 secs. This will
engage Battery Check mode. The voltage reading of the cell will be blinked out continuously – 1 click will terminate the
voltage reading. For example, a 3.7v reading will results in 3 blinks, short pause, then 7 blinks. This pattern will continue
forever until a click terminates it.
.
.
Lock-Out Feature
Often a light will be carried in a pocket, bag or holster where the switch might be accidentally engaged. To avoid accidental
activation, sometimes the tailcap can be loosened to break the battery connection. For lights that don’t work that way, or
another method preferred (avoid wear and tear on the threading), you can enter a special sequence to lock-out the light as
follows, only available in Mode Set operation:
From OFF, 2 clicks in quick sequence followed quickly by a click&hold. The light will blink 4 quick times to
acknowledge Lock-Out has been engaged, then the normal operation of the switch should be disabled. If you see
strobe instead of the 4 quick blinks, you know lock-out did not get set (you probably were too slow).
To restore normal operation, do the same Lock-Out sequence (2 clicks by a click&hold). The 4 quick blinks should
appear to acknowledge the action.
For both Ramping and Mode Set operation, lock-out will automatically be activated after 20 seconds of the button being
held. This is meant as a safety precaution if physically stuck, but can also be activated manually.
When enabled, the Indicator LED can be used for the following:
to locate the flashlight in the dark (Locator feature)
to blink out the battery level
as a secondary indicator of blinking when the main LED blinks
When the Locator feature is enabled, the LED can be temporarily turned OFF (only in Mode Sets), with the main LED OFF, 1
quick click followed by a click&hold til the main LED goes off. To toggle it back on, repeat the same procedure (OFF -> quick
click, click&hold). Note the locator feature is turned OFF when the light is in Lock-Out.
.
.
Configuration UI Operation
For Ramping, the button is held for 8 seconds, and for Mode Sets, the button must be held for 2.5 seconds to activate the
main Configuration UI settings. The light will blink 2 times quickly, and once slowly to indicate the Configuration UI mode is
active. There are 7 settings, listed in the table below. You can change or leave any of these settings – there’s no need to set
each one. Clicks choose the value for each setting, and each click will blink the light to acknowledge the click. If no clicks are
entered in 4 seconds, the light jumps to the next configuration setting indicated by 2 quick blinks and slow quicks of the
number for what setting it is (ex: 3 slow blinks means the 3rd setting). You can bypass the timeout by doing a click&hold to
skip to the next setting. If you continue to hold it, it will exit configuration UI settings mode altogether, indicated by 4 quick
.
.
Configuration Settings
Setting # Function Clicks Defaults
1 Ramping Mode 1=disable, 2=enable 2
2 Choose Mode Set 1-12 (1-7 is # of modes) – see Mode Sets 4
3 Moon Mode 1=disable, 2=enable 2
4 Mode ordering 1= sets lohi, 2=sets hilo 1
5 Mode Memory 1=disable, 2=enable 1
6 Turbo Timeout 1=disable, 2=30 secs, 3=60 secs, 4=90
1
secs, 5=2 mins, 6=3 mins, 7=5 mins, 8=10
7 Blinky mode 1=disable, 2=one strobe, 3=all
mins
strobes/beacons
3
Mode Set Order Mode Count Mode Percentages Notes
1 1 full only (full is always max FET, no 7135)
2 2 10-full max 7135, max FET
3 3 5-35-full 5=1/2 7135, 35=mixed
4 4 2-10-40-full 10=max 7135, 40=mixed
5 5 2-5-10-40-full 10=max 7135, 40=mixed
6 6 TK BLF A6 7 mode 6 well evenly spread
7 7 1-2.5-6-10-35-65-max 10=max 7135, 35=mixed
8 3 2-20-full 2=1/5 7135, 20=mixed
9 3 2-40-full 2=1/5 7135, 40=mixed
10 3 10-35-full 10=max 7135, 35=mixed
11 3 10-50-full 10=max 7135, 50=mixed
12 4 TK BLF A6 4 mode 4 well evenly spread
.
.
Advanced Configuration UI Operation
The Advanced Configuration UI settings is activated from Battery Check mode by doing a click& hold for at least 1.1 seconds.
The battery voltage reading will be interrupted, then the light will blink 2 times quickly, and once slowly to indicate the Adv.
Configuration UI mode is active. There are 5 settings summarized below, and operates the same as the main configuration UI.
Setting # Function Clicks Defaults
1 Locator LED feature 1=disable, 2=enable 2
2 Set Moonlight Level 1 – 7 (PWM value) 3
3 Battery level Indicator LED Only 1=disable, 2=enable 1
4 Indicator LED Enable 1=disable, 2=enable 2
5 Power switch modes w/mem 1=disable, 2=enable 1
Este es el texto comercial de la marca sobre la linterna:
BLF Q8
This flashlight is completely designed and developed by flashlight enthusiasts from around the world, gathered on the website BudgetLightForum.com
The result is a highly versatile flashlight.
It can be powered by one to four 18650 Lithium Ion batteries and is controlled by an easy to use electronic side switch.
The four high performance neutral white Cree XPL LEDs are mounted on a copper plate for maximum light output and reliability.
The custom built circuit board for the Q8 allows the light to operate from below 1 lumen firefly mode to a massive 4000+ lumens.
Very high frequency insures no audible or visible PWM.
The features in this one flashlight makes it suitable for a lot of situations a flashlight is needed for.
Photographers, campers, fisherman, cyclist and emergency workers can fit the Q8 to a tripod for hands free use.
BLF Q8
A classic soda/soup can flashlight design, re-engineered with more functionality, power and efficiency.
4000 lumen of flood and decent throw in a high quality, easy to use flashlight.
This flashlight lights up a large area to at least 150 meters away.
Cree XPL V6 3D Neutral White LEDs are known for their quality and durability. These offer a pleasant tint.
The custom DTP copper plate provides the best possible heat dissipation.
The BLF Q8 uses up to four 18650 batteries.
It works with just one battery with reduced output on the higher modes and with every battery added it can work longer and with two or more batteries used the brightest modes are fully functional.
It is operated with a side switch.
.
The software makes it very easy to use.
Every user can choose to configure how the BLF Q8 works:
moon/firefly, brightness from barely visible to very low
how many modes the light has
the order of the modes (from hi to low or low to high)
ramping instead of modes (smooth gliding between 150 brightness levels with a click and hold. The light stays in the desired brightness level when the switch is released.)
5 strobe and beacon blinking modes yes or no
to read out voltage of the batteries
The light is safe with features to prevent parasitic drain to avoid depleting the battery when not in use.
lock out of the switch, this prevents accidental turning the light on.
low battery voltage step down and cut off to prevent battery damage.
User configured Turbo timer step down to avoid heat issues.
When the switch is not locked out by user and is pressed for 20 seconds it will automatically lock out and turn the light off, to make sure it will not go on when put in a bag or pocket.
Opposite of the switch a 1/4” UNC thread can be used for mounting the Q8 to a tripod and hands free operation.
With its ease of operation, relative compact size and tripod mount the BLF Q8 is an ideal light to use:
During work in large and small spaces
As theater, photo and movie lighting
On the camping
When fishing or during other outdoor activities
To light up even the biggest rooms during power outage
BLF Q8, a high quality must have!
Color Black
Flashlight Modes Ramping or 12 mode groups to choose from
Lens Glass Lens
Reflector SMO
Switch Type electronic side switch
Tail Stand Yes
Light Source Brand Cree
Light Source Model XPL V6 3D
Lumens (Min) <1 lumen
Lumens (Max) 4000 Lumens
Batteries Included No
Battery Form Factor 18650
Required Battery Count 1 up to 4
¿Quiénes de por aquí estais ya apuntados en la lista y la tenéis pensado comprar cuando salga? ¿Qué opináis de la linterna? Si alguien se ha enterado por este post de la existencia de la linterna y le interesa, que lo comente también, se agradece cualquier comentario, yo estoy bastante interesado, a ver si sale prontito a la venta.
Sé que hay varios compañeros de este foro que estáis apuntados en la lista para comprarla, pero me ha extrañado que nadie haya hablado de ella por aquí, por eso he abierto el hilo, y de paso, quizás se apunte alguna persona más que no estaba al corriente de este tema.
Antes de nada, pongo el hilo original del que saldrá la información que voy a poner:
http://budgetlightforum.com/node/45915
Unas fotos de la linterna, o más bien, del segundo prototipo de lo que será la linterna finalmente:
La linterna estará fabricada por Thorfire, se venderá en Banggood, y vendrá con el logo "BLF Q8", posteriormente la propia Thorfire podrá seguir vendiendo esta linterna, con su propio logo y al precio que ellos consideren oportuno.
Aquí teneis el rendimiento lumínico del prototipo 2 con distintas baterías:
Vale, ya tenemos el rendimiento que saca el tercer prototipo de la BLF Q8, que ahora lleva de serie doble muelle:
Las características de la linterna son estas:
BLF Q8
………….. Marking/logo “BLF Q8” for the groupbuy, manufacturer can choose own marking/logo afterwards
.
.
Pricing
………….. $40 .. including shipping …. manufacturer can decide own pricing afterwards
.
.
Emitters
………….. 4 pieces …. 3535 footprint
.
………….. Cree XPL V6 3D ……. Yes for now it is decided the non HI XPL
.
………….. LEDs mounted on DTP stars (NOW a sweet coper DTP ledboard in one piece!)
.
.
Internals
………….. Integrated LED shelf …. for good thermal dissipation at least 4mm thick
.
………….. 20 AWG Wires …………
.
………….. Driver retainer ring (NOW proto 2 has screws holding the driver down covered with a protective ring)
.
………….. Double springs on tail PCB
.
………….. Threads square or trapeziod (not triangular) for battery tube
.
………….. Anodised threads part battery tube that screws into the head for lock out
.
………….. Tailap can be unscrewed to access the pcb connecting the – side of the cells
.
………….. Threads square or trapeziod (not triangular) for tail cap
.
………….. Threads bezel can be anything manufacturer chooses
.
………….. Electronic side switch (NOW proto 2 with illumination and rubber cover)
.
………….. Mounting for tripod
………………….. mounting nut hole not drilled though the whole body to ensure waterproofing placed opposite of the button
.
.
Optics
………….. Aluminium reflector ……. same top sizes as the older SRK reflectors
.
………….. Glass lens ……………. 2mm thick
.
.
Protective
NOW brass contact ring on driver against wear and tear like high end soda can lights have!
………….. O-ring bezel ………. quality thus thick and perfect fit
.
………….. O-ring battery tube … quality thus thick and perfect fit
.
………….. O-ring tail cap ……. quality thus thick and perfect fit
.
………….. Aliminum alloy …….. 6061-T6
.
………….. Type II anodisation…not HA3 for the groupbuy
.
………….. Waterproof side switch
.
………….. Stainless steel bezel
.
………….. Light comes with spare o-rings in all the sizes used
.
.
Software
………….. Tom E Narsil firmware
………….. Several modes and blink modes
………….. User configurable
………….. Fixed modes and ramping
………….. Voltage check
………….. Low voltage cut off
………….. lock out
.
.
Driver design
………….. Tom E Electronic switch driver for Narsil firmware
………….. Very low parasitic drain
………….. Able to run 1,2,3 and/or 4 button top 18650 cell(s)
.
……. MCU …. Atmel ATTINY85V-10SH or ATTINY85-20SU package is important: 8S2
.
……. FET …. NOW used PSMN3R0-30YLDX we aim for change to PSMN2R0-30YLDX
…………………… form factor: PPAK SO-8
.
……. Resistor ….. 0805 SMD 47K OHM 1% 1/8W
.
……. Resistor ….. 0805 SMD 220K OHM 1% 1/8W
.
……. Resistor ….. 0805 SMD 47K OHM 1% 1/8W
.
……. Diode …….. Schottky, 10v 570 kA SOD323 Manu PN: ZLLS410TA, Digi-Key PN: ZLLS410CT-ND
.
……. Capacitor…. 0805 Ceramic, 12uF 16V X7R
……………………………….. If possible 12 uF or higher instead of 10 uF — may be required
.
……. 7135 chip …. 7135 350 mA 7135 amp regulator used for low modes
.
.
Quality
……………. Samples 100% as agreed and specified before continuation to actual sale.
.
……………. Final production lights 100% as agreed, specified and samples
.
……………. Video of drop test shipment packaging made available before lights available for sale.
…………………. This video shows at least 10 drops of the light in packaging from at least 1 meter high
…………………. falling in different angles, the 8 corners, bottom and side hitting the ground first
.
…………….All lights tested before shipping to spot and fix problems and avoid DOA.
Aquí podeis ver como es el funcionamiento de la linterna con su complejo driver programable:
Summary of Features
Ramping – smooth 150 level ramping, simple click&hold ramps, 1 click ON to last level, 1 click OFF
Mode Sets – Simple 1 click ON, 1 click OFF, navigate to next and previous modes
12 mode sets to choose from, 1 to 8 modes/output levels can be configured, and then saved
Modes can be arranged for low to hi, or hi to low
Multiple strobe and beacon modes can be accessed, total of 5 special modes (16 Hz strobe, police strobe, bike strobe,
2 sec beacon, and 10 sec beacon)
Low Voltage Protection (LVP) – output is decreased starting at ~3.0v, shut off at ~2.7v
Turbo timeout can be enabled/disabled, and the time be set (works for high output levels in Ramping too)
When power is applied, 2 blinks indicate it’s ready
An Indicator LED (SMD LED) is supported as a locator LED and low voltage indicator
Battery Check – blink out the voltage level (ex: 3.7v would be 3 blinks, pause, then 7 blinks)
Lock-out feature for the side switch – enabled and disable by a special click sequence
20 second button press safety lock-out feature (engages lock-out after 20 secs being held)
Mode memory can be enabled to quickly restore the last used mode setting, but not recommended
A power tail switch can be used to change modes w/memory
.
.
Configuration Settings Summary
1. Primary mode setting of Ramping or Mode Set
2. 12 sets of modes to choose from, from 1 to 7 output levels
3. Moonlight mode can be optionally added (enable/disable), and the moon output level custom set
4. Set the mode order, default is low to hi, hi to low can be enabled
5. Enable or disable mode memory
6. Enable/disable turbo timeout and sets the length of time from 30 secs to 10 minutes
7. Enable/disable the Locator LED feature (locate the flashlight in the dark)
8. Set the moon mode brightness from 1-7 (3 is recommended, but 2 may work, and 4-7 used to make it brighter)
9. Configure where Battery voltage level blinks – both on the Indicator LED and primary LED, or just the Indicator LED
10. Enable/disable the Indicator LED – disabled it if it’s not wired up or to disable it’s use completely
11. Enable/disable a power tail switch for switching modes with memory. An OTC (Off Time Cap) is not needed, but may
not work with all hardware designs.
.
.
Ramping Operation
From OFF, click&hold ramps up with a pause at moon level — click to turn ON at last level
From ON, click&hold ramps up, but if at max, it will ramp down – click to turn OFF
Double-click from OFF or ON to turn on max level
Triple-click from OFF or ON to engage Battery Check mode
.
.
Mode Set Operation
From OFF, a click goes to 1st mode, while a click&hold (~1/3 sec) goes to last mode
When ON, a click goes to next mode, while a click&hold goes to the previous mode
if paused in a mode (over 1.2 secs), the mode locks in and then a click will turn the light OFF
If you are locked in a mode, a click&hold will still work to go to previous mode, and the lock-in cancels
in any mode, including OFF, a long hold (over 1.1 sec) will turn the 1st Strobe ON
When in Strobe, clicks without pausing will skip to the next special mode (strobe or beacon). The special mode
navigation works just like normal modes: click&hold goes to the previous special mode, paused in a mode will lock it in
.
.
Low Voltage Protection
With the light ON, when the voltage falls below the threshold of 3.0v, it will blink three times, then drop the light down one
mode. If the current mode is the lowest mode, the battery voltage has to fall below 2.7v for the light to be turned OFF. If the
Indicator LED is enabled, it will blink three times as well every time the modes are dropped down, and will also blink twice
every 8 seconds while the light is ON. Once the light is turned OFF after low voltage has been detected, the Indicator light will
continue to blink twice every 8 seconds for 6 minutes after being turned OFF, then the light goes into power saver mode. The
Indicator LED will be turned OFF if the battery voltage is below 3.0v prior to going into power saver mode. So with a
In a Mode Set (non-ramping), from OFF, do a click quickly followed by a click&hold and keep holding for 2.5 secs. This will
engage Battery Check mode. The voltage reading of the cell will be blinked out continuously – 1 click will terminate the
voltage reading. For example, a 3.7v reading will results in 3 blinks, short pause, then 7 blinks. This pattern will continue
forever until a click terminates it.
.
.
Lock-Out Feature
Often a light will be carried in a pocket, bag or holster where the switch might be accidentally engaged. To avoid accidental
activation, sometimes the tailcap can be loosened to break the battery connection. For lights that don’t work that way, or
another method preferred (avoid wear and tear on the threading), you can enter a special sequence to lock-out the light as
follows, only available in Mode Set operation:
From OFF, 2 clicks in quick sequence followed quickly by a click&hold. The light will blink 4 quick times to
acknowledge Lock-Out has been engaged, then the normal operation of the switch should be disabled. If you see
strobe instead of the 4 quick blinks, you know lock-out did not get set (you probably were too slow).
To restore normal operation, do the same Lock-Out sequence (2 clicks by a click&hold). The 4 quick blinks should
appear to acknowledge the action.
For both Ramping and Mode Set operation, lock-out will automatically be activated after 20 seconds of the button being
held. This is meant as a safety precaution if physically stuck, but can also be activated manually.
When enabled, the Indicator LED can be used for the following:
to locate the flashlight in the dark (Locator feature)
to blink out the battery level
as a secondary indicator of blinking when the main LED blinks
When the Locator feature is enabled, the LED can be temporarily turned OFF (only in Mode Sets), with the main LED OFF, 1
quick click followed by a click&hold til the main LED goes off. To toggle it back on, repeat the same procedure (OFF -> quick
click, click&hold). Note the locator feature is turned OFF when the light is in Lock-Out.
.
.
Configuration UI Operation
For Ramping, the button is held for 8 seconds, and for Mode Sets, the button must be held for 2.5 seconds to activate the
main Configuration UI settings. The light will blink 2 times quickly, and once slowly to indicate the Configuration UI mode is
active. There are 7 settings, listed in the table below. You can change or leave any of these settings – there’s no need to set
each one. Clicks choose the value for each setting, and each click will blink the light to acknowledge the click. If no clicks are
entered in 4 seconds, the light jumps to the next configuration setting indicated by 2 quick blinks and slow quicks of the
number for what setting it is (ex: 3 slow blinks means the 3rd setting). You can bypass the timeout by doing a click&hold to
skip to the next setting. If you continue to hold it, it will exit configuration UI settings mode altogether, indicated by 4 quick
.
.
Configuration Settings
Setting # Function Clicks Defaults
1 Ramping Mode 1=disable, 2=enable 2
2 Choose Mode Set 1-12 (1-7 is # of modes) – see Mode Sets 4
3 Moon Mode 1=disable, 2=enable 2
4 Mode ordering 1= sets lohi, 2=sets hilo 1
5 Mode Memory 1=disable, 2=enable 1
6 Turbo Timeout 1=disable, 2=30 secs, 3=60 secs, 4=90
1
secs, 5=2 mins, 6=3 mins, 7=5 mins, 8=10
7 Blinky mode 1=disable, 2=one strobe, 3=all
mins
strobes/beacons
3
Mode Set Order Mode Count Mode Percentages Notes
1 1 full only (full is always max FET, no 7135)
2 2 10-full max 7135, max FET
3 3 5-35-full 5=1/2 7135, 35=mixed
4 4 2-10-40-full 10=max 7135, 40=mixed
5 5 2-5-10-40-full 10=max 7135, 40=mixed
6 6 TK BLF A6 7 mode 6 well evenly spread
7 7 1-2.5-6-10-35-65-max 10=max 7135, 35=mixed
8 3 2-20-full 2=1/5 7135, 20=mixed
9 3 2-40-full 2=1/5 7135, 40=mixed
10 3 10-35-full 10=max 7135, 35=mixed
11 3 10-50-full 10=max 7135, 50=mixed
12 4 TK BLF A6 4 mode 4 well evenly spread
.
.
Advanced Configuration UI Operation
The Advanced Configuration UI settings is activated from Battery Check mode by doing a click& hold for at least 1.1 seconds.
The battery voltage reading will be interrupted, then the light will blink 2 times quickly, and once slowly to indicate the Adv.
Configuration UI mode is active. There are 5 settings summarized below, and operates the same as the main configuration UI.
Setting # Function Clicks Defaults
1 Locator LED feature 1=disable, 2=enable 2
2 Set Moonlight Level 1 – 7 (PWM value) 3
3 Battery level Indicator LED Only 1=disable, 2=enable 1
4 Indicator LED Enable 1=disable, 2=enable 2
5 Power switch modes w/mem 1=disable, 2=enable 1
Este es el texto comercial de la marca sobre la linterna:
BLF Q8
This flashlight is completely designed and developed by flashlight enthusiasts from around the world, gathered on the website BudgetLightForum.com
The result is a highly versatile flashlight.
It can be powered by one to four 18650 Lithium Ion batteries and is controlled by an easy to use electronic side switch.
The four high performance neutral white Cree XPL LEDs are mounted on a copper plate for maximum light output and reliability.
The custom built circuit board for the Q8 allows the light to operate from below 1 lumen firefly mode to a massive 4000+ lumens.
Very high frequency insures no audible or visible PWM.
The features in this one flashlight makes it suitable for a lot of situations a flashlight is needed for.
Photographers, campers, fisherman, cyclist and emergency workers can fit the Q8 to a tripod for hands free use.
BLF Q8
A classic soda/soup can flashlight design, re-engineered with more functionality, power and efficiency.
4000 lumen of flood and decent throw in a high quality, easy to use flashlight.
This flashlight lights up a large area to at least 150 meters away.
Cree XPL V6 3D Neutral White LEDs are known for their quality and durability. These offer a pleasant tint.
The custom DTP copper plate provides the best possible heat dissipation.
The BLF Q8 uses up to four 18650 batteries.
It works with just one battery with reduced output on the higher modes and with every battery added it can work longer and with two or more batteries used the brightest modes are fully functional.
It is operated with a side switch.
.
The software makes it very easy to use.
Every user can choose to configure how the BLF Q8 works:
moon/firefly, brightness from barely visible to very low
how many modes the light has
the order of the modes (from hi to low or low to high)
ramping instead of modes (smooth gliding between 150 brightness levels with a click and hold. The light stays in the desired brightness level when the switch is released.)
5 strobe and beacon blinking modes yes or no
to read out voltage of the batteries
The light is safe with features to prevent parasitic drain to avoid depleting the battery when not in use.
lock out of the switch, this prevents accidental turning the light on.
low battery voltage step down and cut off to prevent battery damage.
User configured Turbo timer step down to avoid heat issues.
When the switch is not locked out by user and is pressed for 20 seconds it will automatically lock out and turn the light off, to make sure it will not go on when put in a bag or pocket.
Opposite of the switch a 1/4” UNC thread can be used for mounting the Q8 to a tripod and hands free operation.
With its ease of operation, relative compact size and tripod mount the BLF Q8 is an ideal light to use:
During work in large and small spaces
As theater, photo and movie lighting
On the camping
When fishing or during other outdoor activities
To light up even the biggest rooms during power outage
BLF Q8, a high quality must have!
Color Black
Flashlight Modes Ramping or 12 mode groups to choose from
Lens Glass Lens
Reflector SMO
Switch Type electronic side switch
Tail Stand Yes
Light Source Brand Cree
Light Source Model XPL V6 3D
Lumens (Min) <1 lumen
Lumens (Max) 4000 Lumens
Batteries Included No
Battery Form Factor 18650
Required Battery Count 1 up to 4
¿Quiénes de por aquí estais ya apuntados en la lista y la tenéis pensado comprar cuando salga? ¿Qué opináis de la linterna? Si alguien se ha enterado por este post de la existencia de la linterna y le interesa, que lo comente también, se agradece cualquier comentario, yo estoy bastante interesado, a ver si sale prontito a la venta.